Java 17: Pattern Matching for Switch


The Java 17 release introduces  Pattern Matching for switch as a preview language feature. Pattern matching  allows case labels with patterns rather than just constants, which gives us more flexibility when defining conditions for switch cases.  

  • Type pattern

How to perform a different action for each type of object, without using instance of?

Now the switch selector expression can be of any type.


  • Sealed class

Using pattern matching and sealed class, the compiler can check that all allowed subclasses are covered and there is no longer a need for a default case.


  • Guarded pattern

Guarded pattern allow us to perform additional checks.


The full implementation of this tutorial can be found over on GitHub.

Non-instantiable class

Sometimes we need to develop a class Helper, also known as Utility class, contain a group of reusable methods across the application. As an example consider Apache StringUtils or IOUtils. It is stateless frequently with methods as static and cannot be instantiated.

We can eliminate the instantiation of default constructor with an explicit private constructor and an Exception to indicate that the requested operation is not supported, it guarantees the class will never be instantiated under any circumstances:

By marking your class with @UtilityClass, lombok will automatically generate a private constructor that throws an exception:

Vanilla:

The full implementation of this tutorial can be found over on GitHub.

Continuous Deployment: Java EE with Kubernetes on Google Cloud

In December of 2017 I was working on a Java EE web project from my startup.
One of the first things that needed to be defined was where to host the application.
After studying Heroku, Openshift, AWS and Google Cloud, I decided to use Docker containers on Google Cloud infrastructure.

Google Cloud with Docker container lets you use all the power of the Java EE stack. It has low prices, ease of configuration, scalability and platform independence.

As it was a private project, I chose to use Bitbucket because it has Git and pepilines to do the integrations with Google Cloud and Slack.

The following are the settings required to run the continuous integration and continuous deployment pipelines:

At the root of the Java project two files are required:

/Dockerfile

/bitbucket-pipelines.yml

You must add three Environment variables:

Go to your repository settings in Bitbucket and navigate to Pipelines > Environment variables. Create a new variable named GCLOUD_API_KEYFILE and paste the encoded service account credentials in it.

Add a new variable called GCLOUD_PROJECT and set the value to the key of your Google Cloud project.

Add another variable called APP_NAME and set the name of your app.

In Pipelines you can configure the build schedule.

See also:

https://confluence.atlassian.com/bitbucket/deploy-to-google-cloud-900820342.html

https://cloud.google.com/kubernetes-engine/docs/tutorials/hello-app

Deploying a containerized Java web application

Install Docker CE

1) Set up the docker repository:

sudo apt-get update

sudo apt-get install apt-transport-https ca-certificates curl software-properties-common

curl -fsSL https://download.docker.com/linux/ubuntu/gpg | sudo apt-key add -

sudo add-apt-repository "deb [arch=amd64] https://download.docker.com/linux/ubuntu $(lsb_release -cs) stable"

2) Install Docker CE

sudo apt-get update

sudo apt-get install docker-ce

3) Verify the installation

$ sudo docker run hello-world

Deployment with the jboss/wildfly Docker image

AdminFaces is an open source project which brings Bootstrap and AdminLTE to your application via a PrimeFaces theme and a JSF responsive template.

The sample files can be downloaded here

1) Create docker file Dockerfile with following content:

 FROM jboss/wildfly
 ADD admin-starter.war /opt/jboss/wildfly/standalone/deployments/


2) Place your admin-starter.war file in the same directory as your Dockerfile.

3) Run the build with:

sudo docker build --tag=admin-starter-app .

4) Run the container with:

sudo docker run -it -p 8080:8080 admin-starter-app

Application will be deployed on the container boot.

The application is available at http://localhost:8080/admin-starter

Pushing and Pulling to and from Docker Hub

1) Log into the Docker Hub from the command line

sudo docker login

2) Tag your image

sudo docker tag admin-starter-app yourhubusername/admin-starter-app:v0.0.1

3) Push your image to the repository you created

sudo docker push yourhubusername/admin-starter-app:v0.0.1

4) Create your Docker droplet

https://www.digitalocean.com/products/one-click-apps/docker/

5) Login in Digital Ocean

ssh user@yourDigitalOceanMachine

6) Allow Connections

sudo ufw allow 8080

7)  Pull your image

sudo docker pull yourhubusername/admin-starter-app:v0.0.1

8) Run the container with

sudo docker run -it -p 8080:8080 yourhubusername/admin-starter-app:v0.0.1

Application will be deployed on the container boot.

The application is available at http://yourDigitalOceanMachine:8080/admin-starter
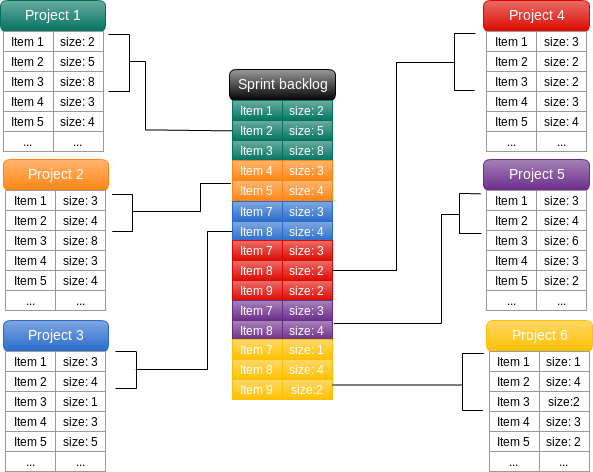


Le Scrum avec une petite équipe et des multiples Projets

Dans mon entreprise, le Scrum a été adoptée comme cadre de développement Agile, et notre équipe a commencé à travailler sur le maintenance de six projets avec différentes technologies.

Notre equipe de Scrum a ces rôles:

  • 4 Développeurs Java
  • 1 Propriétaire du Produit (product owner)
  • 1 Analyste de l’assurance de la Qualité

OK, mais comment pourrions-nous travailler sur tous nos différents projets et encore profiter des avantages de le Scrum?

Il n’a pas été possible de créer une équipe pour chaque projet, ni même d’arrêter de travailler sur l’un des projets. Nous avons donc commencé à développer notre liste de tâches (“sprint backlog”) par ces étapes:

  1. Prévoir combien des changements réels que nous aurons au cours du sprint.
  2. Estimer les points prioritaires parmi les six carnets de produits, en utilisant Planning Poker.
  3. Définissez le pourcentage d’importance que chaque projet aura dans le sprint.
  4. Déplacer ces éléments vers la liste de tâches (“sprint backlog”).

Sprint Backlog

Au cours des trois dernières années, nous avons eu du succès avec cette approche. Avez-vous fait face à un cas similaire? S’il vous plaît, n’oubliez pas de commenter et partager vos expériences.

Original

Scrum with a Small Team and Multiple Projects

At my company, Scrum was adopted as our Agile development framework, and our team began working on the maintenance of six projects with different technologies.

Our Scrum team has these roles:

  • 4 Java developers
  • 1 Product owner
  • 1 QA analyst

OK, but how could we work on all our various projects and still take advantage of the benefits of Scrum?

It was not possible to create a team for each project, nor even to stop working on any of the projects. So we’ve started developing our sprint backlog via these steps:

  1. Predict how many real shifts we will have during the sprint.
  2. Estimate the priority items from among the six product backlogs, using Planning Poker.
  3. Set the percentage of importance that each project will have in the sprint.
  4. Move those items to the sprint backlog.

Sprint Backlog

In the last three years, we have had success with this approach. Have you faced a similar case? Please be sure to comment and share your experiences.

Original